老夫最近又要做 Android APP 的开发工作了(我特码到底是什么工程师?),上次做 Android 开发还是在四年前。
四年多过去了,Android 也升级了好几个大版本,而 Google 这边也一直在更新支持库和开发工具,甚至还引入了 Kotlin 作为默认的开发语言。同时在官方文档里也推荐了标准的开发模式,例如数据绑定、访问数据库的方式、AndroidX 库等等,当时这些东西还是在 beta 阶段,不知道啥时候已经正式发布了。本想快速把这个 APP 做起来,但是想了下还不如花点时间做个好的架构,所以最近几天都在研究怎么使用 Google 推荐的架构方式去开发 APP。
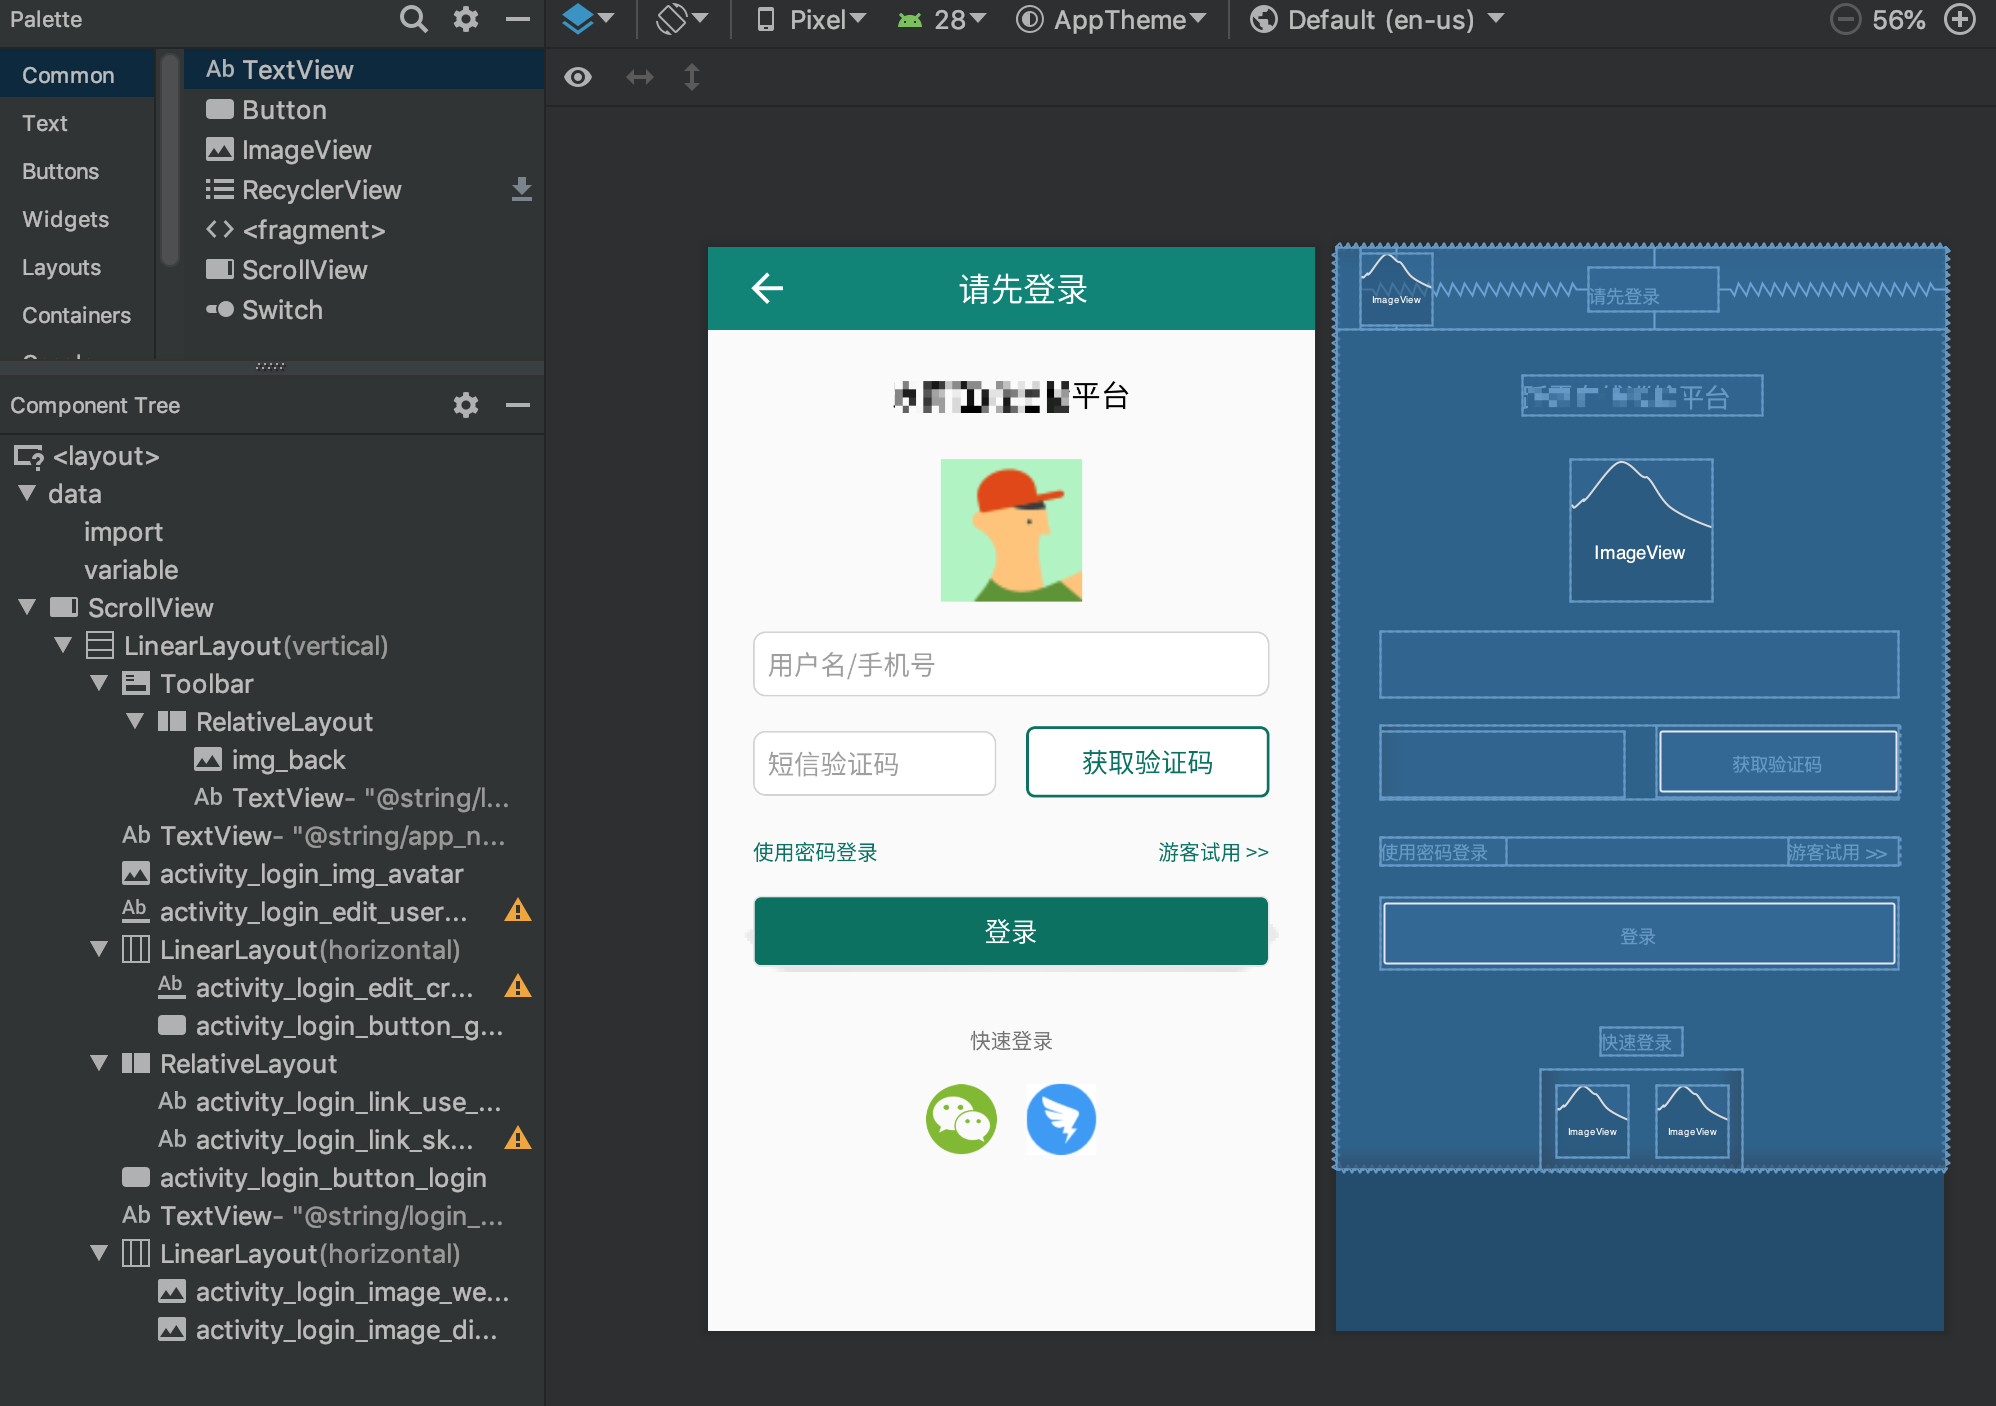
下面正式开始搭建一个“现代化”的 APP 工程。当然了,老夫虽然要完成任务,但觉得还是要掌握其原理,所以本篇日志都是以学习为主,一边搭建工程一遍看 Android 类库的源代码,把这些东西记录一下。想要直接搭建项目的教程或者 samples,直接去谷歌官网找就好啦。老夫这里要做的主要是下面这俩页面:

PS:还支持自动保存用户名密码到 Google 账户,实在是很高端 :)。
Google 官方推荐的 APP 架构方式,请参考这里:https://developer.android.com/jetpack/docs/guide
其实呢,这些东西老夫在很早以前就做过了,不过当时是 Windows 上的 UI 项目,但基本上大同小异。所以 Google 推荐的架构方式无非就是:
- 数据绑定,MVVM 模式,使视图、数据和控制逻辑相互分离。老夫几年前做 Android 的时候看到这个东西还在 beta 阶段,就没有采用。
- 依赖注入:这个就不需要多说了,基本上大项目都会用。Android 官方推荐的 DI 库是 Dagger 2。老夫尝试使用 Dagger 2,发现这个库设计得是相当蛋疼,折腾了 N 久之后最终决定放弃。
- ORM 工具:采用的 Room,这个库用起来还不错,总算可以告别蛋疼的直接和 SQLite 打交道。并且这个 ORM 支持 LiveData,可以结合数据绑定使用。
- 网络库 Google 推荐 Retrofit。不过个人觉得没有比 Volley 的使用方式好到哪里去,写起来也比较蛋疼。
- 推出全新的 androidx 库,总算可以和以前满天飞的各种 support 库说再见,不过有时候会有第三方类库的兼容性问题。
由于 Android 是一个已经维护了十年的巨型项目,本身就很复杂,加之这些推荐库也不完全是 Google 自己开发的(估计很多都是买过来的),这些东西全部揉在一起,就变得有点蛋疼,老夫这几天也是踩了好多坑才把项目搭建起来。DI 的那个库最终还是放弃掉了,因为感觉加上后反而变得更凌乱,而且各种奇奇怪怪的细节我到现在还没搞明白。
项目依赖库
由于使用了 Google 新折腾的 AndroidX 库,所以 gradle 文件看起来清爽多了:
dependencies {
    implementation fileTree(include: ['*.jar'], dir: 'libs')

    implementation 'androidx.appcompat:appcompat:1.0.2'
    implementation 'com.google.android.material:material:1.0.0'
    implementation 'androidx.lifecycle:lifecycle-extensions:2.0.0'
    implementation 'com.android.support:support-vector-drawable:28.0.2'
    implementation 'com.squareup.retrofit2:retrofit:2.5.0'
    implementation 'com.squareup.retrofit2:converter-gson:2.3.0'

    def room_version = "2.0.0"
    implementation "androidx.room:room-runtime:$room_version"
    annotationProcessor "androidx.room:room-compiler:$room_version"

    ......
}
在使用时也不会出现什么 v4、v6 等我压根搞不清楚是怎么归类的支持库了,一切都在 androidx.* 里面,看起来清爽多了。
import androidx.annotation.Nullable;
import androidx.appcompat.app.AlertDialog;
import androidx.appcompat.app.AppCompatActivity;
import androidx.databinding.DataBindingUtil;
import androidx.lifecycle.ViewModelProviders;
不过兼容库还是存在的,比如 Fragment 在 android.* 和 androidx.* 里都有,有时候还是要踩一下坑的。
做个登录页面
老夫一开始就拿着登录页面来练手 Android 的 MVVM 架构。按照推荐,APP 大体的结构是下面酱紫滴(图片抄自官网):

ViewModel 作为 UI 和 Model 之间的联系层,按理说不应该依赖 UI 的任何内容。对于 Android 来说更是这样,因为如果引用 UI 的元素,则很可能会引起内存泄漏。不过 Google 搞了一个这样的类:
public class AndroidViewModel extends ViewModel {
    @SuppressLint("StaticFieldLeak")
    private Application mApplication;

    public AndroidViewModel(@NonNull Application application) {
        mApplication = application;
    }

    /**
     * Return the application.
     */
    @SuppressWarnings("TypeParameterUnusedInFormals")
    @NonNull
    public <T extends Application> T getApplication() {
        //noinspection unchecked
        return (T) mApplication;
    }
}
What?在 ViewModel 里加了一个 Application 引用,说好的 ViewModel 呢?经过研究后发现,ViewModel 里经常会要用到一些资源,比如访问字符串的资源文件决定一些内容、颜色等等,这样就必须要有 Context 才行了。而且对于 Android APP 来说,Application 是贯穿整个生命周期的,所以也不会引起什么内存泄漏,毕竟如果没有 Application 这个 Context 了,程序也就挂掉了。
好吧,首先来写登录页面的 layout 文件。其实老夫挺喜欢摆界面的,因为不怎么需要动脑子。Android Studio 3.4 版本的设计器也做得比较完善了,用起来还是可以的:
由于要使用数据绑定,按照官方文档,最上层的元素要是 layout,而且里面要嵌一个 data 标签,以便在 xml 里面使用。同时还可以引入一些类的 Type,这样才能直接在数据绑定的表达式里面使用。
<?xml version="1.0" encoding="utf-8"?>
<layout xmlns:android="http://schemas.android.com/apk/res/android"
    xmlns:app="http://schemas.android.com/apk/res-auto"
    xmlns:tools="http://schemas.android.com/tools">
    <data>
        <import type="android.view.View" />
        <variable name="viewmodel" type="com.yuexiao.inspection_android.ui.login.LoginViewModel" />
    </data>

    ....

</layout>
在这个页面里,老夫想要实现点击“使用密码登录”之后,“获取验证码”的按钮隐藏起来,同时左侧的输入框沾满整行,并且输入文字隐藏起来。酱紫的话 ViewModel 就需要一个变量表示当前是使用验证码还是使用密码:
public class LoginViewModel extends AndroidViewModel {

    private ObservableBoolean useVerificationCode;
    private MutableLiveData<String> userName;
    private MutableLiveData<String> password;
    private ObservableBoolean isLogin;

    public LoginViewModel(@NonNull Application application) {
        super(application);

        useVerificationCode = new ObservableBoolean(true);
        isLogin = new ObservableBoolean(false);
        userName = new MutableLiveData<>();
        password = new MutableLiveData<>();

        userName.setValue(Strings.EMPTY);
        password.setValue(Strings.EMPTY);
    }

    ...... //省略 get 方法

    ......
}
这里的 Observable 变量就是非常熟悉的东西了,比如 WPF 里也叫这名字。ObservableBoolean 的最上层类(除了 Object)是 BaseObservable 类,实现了观察者的关联、通知等操作,大体代码如下:
public class BaseObservable implements Observable {
    private transient PropertyChangeRegistry mCallbacks;

    ......

    @Override
    public void addOnPropertyChangedCallback(@NonNull OnPropertyChangedCallback callback) {
        synchronized (this) {
            if (mCallbacks == null) {
                mCallbacks = new PropertyChangeRegistry();
            }
        }
        mCallbacks.add(callback);
    }

    ......

    public void notifyPropertyChanged(int fieldId) {
        synchronized (this) {
            if (mCallbacks == null) {
                return;
            }
        }
        mCallbacks.notifyCallbacks(this, fieldId, null);
    }
}
看吧,现在越来越喜欢 C# 了,这些乱七八糟的一个 event 都能搞定……好吧,跑题了。
Android 还提供了 LiveData 类,这玩意是个非常重要的核心类,其最重要的功能是把数据与生命周期(lifecycle)相关联。对于 Android APP 而言,每个 Activity 和 Fragment 都有其生命周期,而且,这些玩意还有 started、pause、resume、stop 等很多状态。如果容器被暂停放后台去了,我们通知 UI 来更新也没有什么用,如果容器销毁了,我们还去更新 UI 甚至会出错(想必遇到过很多次这种蛋疼的情况),所以就有 LiveData 这个玩意儿。
LiveData 的成员变量定义如下:
public abstract class LiveData<T> {
    final Object mDataLock = new Object();
    static final int START_VERSION = -1;

    static final Object NOT_SET = new Object();

    private SafeIterableMap<Observer<? super T>, ObserverWrapper> mObservers =
            new SafeIterableMap<>();

    // how many observers are in active state
    int mActiveCount = 0;
    private volatile Object mData = NOT_SET;
    // when setData is called, we set the pending data and actual data swap happens on the main
    // thread

    volatile Object mPendingData = NOT_SET;
    private int mVersion = START_VERSION;

    private boolean mDispatchingValue;
    private boolean mDispatchInvalidated;

    ......
}
重点是这个玩意引入了 mPendingData,当在后台线程更新数据时,把更新后的值先 pending 起来,等到主线程再放入 mData 里面:
    private final Runnable mPostValueRunnable = new Runnable() {
        @Override
        public void run() {
            Object newValue;
            synchronized (mDataLock) {
                newValue = mPendingData;
                mPendingData = NOT_SET;
            }
            //noinspection unchecked
            setValue((T) newValue);
        }
    };
对于其中的 observer,都继承自 ObserverWrapper 类,其中重点是 LifecycleOwner,这个东西就是 observer 所在的容器。这个默认实现是只有容器在 active 状态,才会去 notify(参考源代码的 considerNotify 这个方法)。
    @MainThread
    public void observe(@NonNull LifecycleOwner owner, @NonNull Observer<? super T> observer) {
        assertMainThread("observe");
        if (owner.getLifecycle().getCurrentState() == DESTROYED) {
            // ignore
            return;
        }
        LifecycleBoundObserver wrapper = new LifecycleBoundObserver(owner, observer);
        ObserverWrapper existing = mObservers.putIfAbsent(observer, wrapper);
        if (existing != null && !existing.isAttachedTo(owner)) {
            throw new IllegalArgumentException("Cannot add the same observer"
                    + " with different lifecycles");
        }
        if (existing != null) {
            return;
        }
        owner.getLifecycle().addObserver(wrapper);
    }
粗略看完 LiveData,发现引入生命周期后就比 ObservableField 复杂了很多。先不管一些细节,继续构建登录的页面吧。为了把输入手机号的文本框与 userName 这个 MutableLiveData 进行绑定,需要使用绑定表达式,具体语法参见这里。
            <EditText
                android:id="@+id/activity_login_edit_username"
                style="@style/EditText.InputField"
                android:layout_width="@dimen/activity_login_input_width"
                android:layout_height="wrap_content"
                android:layout_marginTop="20dp"
                android:hint="@string/login_username"
                android:layout_gravity="center_horizontal"
                android:inputType="text"
                android:autofillHints="username"
                android:maxLength="11"
                android:text="@={viewmodel.userName}"
                />
尤其要注意需要双向绑定的时候别忘掉了 @ 后面的等于号(=),不然就是个单向绑定了,用户输入了内容后 LiveData 并不会得到更新。至于那个输入验证码的编辑框,在用户选择输入密码后宽度会改变,所以我们把 layout_width 绑定设置为根据 useVerificationCode 这个 ObservableBoolean 来在资源文件里选择对应的宽度。
                <EditText
                    android:id="@+id/activity_login_edit_credential"
                    style="@style/EditText.InputField"
                    android:layout_width="@{viewmodel.useVerificationCode ? @dimen/activity_login_verification_code_width : @dimen/activity_login_input_width, default=@dimen/activity_login_verification_code_width}"
                    android:layout_height="wrap_content"
                    android:layout_gravity="center"
                    android:autofillHints="password"
                    android:hint="@{viewmodel.useVerificationCode ? @string/enter_verification_code : @string/enter_password}"
                    tools:hint="@string/enter_verification_code"
                    android:inputType="@{viewmodel.useVerificationCode}"
                    android:text="@={viewmodel.password}"
                    />
不过呢,对于这个宽度字段,Android 的默认实现居然不包含(为神马这个常用的东西都没有默认实现)!所以我们要写 BindingAdapter 让它认识这个绑定,写在 ViewModel 类里面:
    @BindingAdapter("android:layout_width")
    public static void setLayoutWidth(View view, float width) {
        ViewGroup.LayoutParams params = view.getLayoutParams();
        params.width = (int)width;
        view.setLayoutParams(params);
    }
@BindingAdapter 注解代表识别的属性名称,方法的第一个参数为这个 View 的实例对象,后面的参数则为绑定后传入的属性值,在这里我们是从dimen 资源文件里找出来的。总感觉这种实现方式有点傻。inputType 也就与之类似了,我们在 xml 里传入的是一个 ObservableBoolean,所以参数也要是 boolean 类型才能与之匹配:
    @BindingAdapter("android:inputType")
    public static void setInputType(EditText editText, boolean useVerificationCode) {
        editText.setInputType(useVerificationCode ? InputType.TYPE_CLASS_NUMBER : InputType.TYPE_CLASS_TEXT | InputType.TYPE_TEXT_VARIATION_PASSWORD);
        editText.setFilters(new InputFilter[] { new InputFilter.LengthFilter(useVerificationCode ? 6 : 50) } );
    }
ViewModel 写完后,在 Activity 里就要把 ViewModel 绑定过去。Google 提供了 DataBindingUtil 这个类,并且在 IDE 编辑时会自动生成 Activity 对应的绑定类。在 onCreate 里实现绑定就好了。
    @Override
    protected void onCreate(@Nullable Bundle savedInstanceState) {
        super.onCreate(savedInstanceState);

        vm = ViewModelProviders.of(this).get(LoginViewModel.class);
        userRepository = UserRepository.getInstance(getApplicationContext());

        ActivityLoginBinding binding = DataBindingUtil.setContentView(this, R.layout.activity_login);
        binding.setViewmodel(vm);

        ......
    }
运行效果参见最开始的截图。可以看到使用数据绑定后,不用响应用户时间去设置各个控件的状态了,very good。对于这个 LoginActivity 的实现,老夫还是很顺利的。
数据持久化
服务端采用 JWT 方式进行认证,老夫要把登录用户的一些基本信息和 token 保存在客户端的数据库内。Android 现在官方推荐 Room,用起来和 JPA 很类似。先写一个 UserDao 用来访问数据库,大概就是这样子:
@Dao
public interface UserDao {

    @Query("SELECT * FROM user WHERE active = 1 LIMIT 1")
    LiveData<User> findActiveUser();

    @Insert(onConflict = OnConflictStrategy.REPLACE)
    void insert(User user);

    ......
}
User 就是我们自己定义的一个 POJO,与 JPA 类似,这个东东会自动根据 POJO 的字段来生成对应的列。不过需要注意的是,这个东东仅支持最基本的类型,连 Date 这个使用率超高的对象都不支持,必须自己写 converter 把它转换成 Long 进行存储,貌似有点傻。
public class Converters {

    @TypeConverter
    public static Date fromTimestamp(Long value) {
        return value == null ? null : new Date(value);
    }

    @TypeConverter
    public static Long dateToTimestamp(Date date) {
        return date == null ? null : date.getTime();
    }

}
此外,我们还需要一个 RoomDatabase 的实例才能去访问这个数据库。由于不使用 DI,我就自己搞一个单例模式来提供数据库访问对象吧:
@Database(entities = {User.class}, version = 1)
@TypeConverters( {Converters.class} )
public abstract class AppDatabase extends RoomDatabase {

    private static volatile AppDatabase INSTANCE;

    public abstract UserDao userDao();

    public static AppDatabase getInstance(final Context context) {
        if (INSTANCE == null) {
            synchronized (AppDatabase.class) {
                if (INSTANCE == null) {
                    INSTANCE = Room.databaseBuilder(context.getApplicationContext(),
                            AppDatabase.class, "yuexiao_inspection").build();
                }
            }
        }

        return INSTANCE;
    }

}
一切的一切都是 abstract 和 interface 就可以了,我们在 gradle 文件里配置的 annotationProcessor 会自动生成对应的实现类,和 Spring Boot 很像。
乃可能发现了一个问题,就是 Dao 层为啥直接返回了一个 LiveData 的类型?按照 Google 的文档,这个东西就是返回 LiveData(当然乃也可以直接使用 POJO),目的是 Room 只有在 observer 的时候才会进行更新和通知。与之对应,我们需要搞一个 Repository 类来关联 UI 和数据库。
那么处理网络请求应该写在哪里呢?Google 说应该放在 Repository 里面,另外如果有缓存,也应该在 Repository 这里面提供。What?这还叫 Repository 吗?感觉是一个 DB+Service+API 访问+Cache 揉杂在一起的四不像,咱能换个名字吗?好吧,既然入坑了,我们就按照这个思路继续。
网络请求
Google 推荐了两种网络请求库,Volley 和 Retrofit。Volley 我之前用过了,所以来用一下 Retrofit。根据其他人的说法,Retrofit 更容易使用,那么老夫要来体验一下。对于 LoginService,写一个 interface:
public interface LoginService {

    @POST("/users/public/login/{userName}")
    Call<ResponseEntity<UserData>> loginByUserName(@Path("userName") String userName, @Body String password);

}
看起来很和谐,不过为啥是返回的 Call<T> 呢?
与 Room 类似,Retrofit 也需要一恶搞实体类来执行具体操作。由于没有 DI,我也得自己去管理这个实例,所以也搞一个单例模式就好了。
public class RetrofitService {

    ......  //省略单例模式代码

    private Retrofit retrofit;

    private RetrofitService() {
        gson = new Gson();
        retrofit = new Retrofit.Builder()
                                .addConverterFactory(GsonConverterFactory.create())
                                .baseUrl("http://******/").build();
    }

    public LoginService getLoginService() {
        return retrofit.create(LoginService.class);
    }

    ......
}
看起来比较正常。但是 Google 在这个例子里省略了出错的处理,那么如果请求出错了要怎么处理呢?按照一般逻辑,出错有两种:第一种是网络出错,这个基本都是 Retrofit 框架抛出的错误,第二种是服务端返回的错误,此时网络并没有出错。对于这两种情况,其实我们 UI 层的处理基本是一样的,我们现在需要处理这两种情况。
实际上 Google 在另一个 sample 里面给出了一个实现(不过没有任何说明),那就是为所有的网络返回的资源包装一个 Resource 类,用来标示这个请求是否成功:
public class Resource<T> {

    private Status status;

    private T data;

    private String message;

    ...... //省略 getter, setter

   public enum Status {
        Sucess,
        Loading,
        Error
    }
}
然后,我们的 Repository 里的 login 方法就变成了这个样子:
    public LiveData<Resource<Tuple<String, UserData>>> loginByUserName(String userName, String password) {
        MutableLiveData<Resource<Tuple<String, UserData>>> data = new MutableLiveData<>();

        loginService.loginByUserName(userName, password).enqueue(new Callback<ResponseEntity<UserData>>() {
            @Override
            public void onResponse(@NonNull Call<ResponseEntity<UserData>> call, @NonNull Response<ResponseEntity<UserData>> response) {
                ResponseEntity<UserData> responseEntity = RetrofitService.getInstance().parseResponse(response);
                if (responseEntity.isSuccess()) {
                    String token = response.headers().get("Authorization");
                    data.postValue(new Resource<>(new Tuple<>(token, responseEntity.getResult())));

                    executor.execute(() -> persistLoginUser(token, responseEntity.getResult()));
                } else {
                    data.postValue(new Resource<>(null, responseEntity.getErrorMessage()));
                }
            }

            @Override
            public void onFailure(@NonNull Call<ResponseEntity<UserData>> call, @NonNull Throwable t) {
                data.postValue(new Resource<>(null, t.getLocalizedMessage()));
                Log.e(getClass().getSimpleName(), t.getMessage(), t);
            }
        });

        return data;
    }
看起来有点糟糕,实际上能简化的也只有这个 LiveData 的具体类型。至于 Retrofit 的 Callback,按照在 Repository 里包 LiveData 的设计,好像没有办法简化,因为在回调方法种,我们需要访问 LiveData 去 postValue。Retrofit 的回调方法会放在主线程种,因此我们要用后台的 executor 去访问数据库保存信息。所以最终就变成这样了。
此外还有一个坑,那就是 Retrofit 如果接收到 4xx/5xx 之类的状态码,会把 body 放在 errorBody 里面而不会去解析其内容,也不会调用 onFailure,因为 onFaillure 好像是处理在网络层面的错误,比如超时等,可是为啥超时的 Throwable 的消息是 timeout 这个单词呢?那我还得自己去解析这些东西去找对应的字符串资源嘛……感觉相当麻烦。即使我们的服务端是按照 ResponseEntity 这个格式返回的。所以我还写了一个 parseResponse 来统一处理这种情况:
    public <T> ResponseEntity<T> parseResponse(Response<ResponseEntity<T>> response) {
        if (response == null) return null;

        if (response.isSuccessful() && response.body() != null) return response.body();
        if (!response.isSuccessful() && response.errorBody() != null) {
            try {
                return gson.fromJson(response.errorBody().string(), ResponseEntity.class);
            } catch (IOException ex) {
                return null;
            }
        }
        return new ResponseEntity<>(Strings.EMPTY);  // get String resource from UI
    }
Retrofit 还提供了 CallAdapter 来处理返回情况,老夫大概试了一下,觉得不比这种实现方式简单,还掉了不少坑,不过乃可以自己参照这个 sample 试一下。
这样折腾之后,UI 层面就很简化了,它只需要 observer 这个 LiveData 的状态,然后根据 Resource 里包的 status 就可以判断是否成功了:
    private void onLoginClicked(View v) {
        if (!checkUserName()) return;

        vm.getIsLogin().set(true);
        userRepository.loginByUserName(vm.getUserName().getValue(), vm.getPassword().getValue()).observe(this, result -> {
            vm.getIsLogin().set(false);
            if (result.getStatus() == Resource.Status.Sucess) {
                doLoginComplete();
            } else if (result.getStatus() == Resource.Status.Error) {
                new AlertDialog.Builder(this)
                        .setTitle(R.string.login)
                        .setMessage(Strings.isNullOrEmpty(result.getMessage()) ? getString(R.string.login_failed_with_no_message) : result.getMessage())
                        .setPositiveButton(R.string.button_ok, null)
                        .show();
            }
        });
    }
看起来好像使用了 Google 推荐的模式后代码变得非常复杂了,尤其是那个 Repository 结合了 Retrofit 和 LiveData 看起来更蛋疼,这也就是为啥很多人都在用 RxJava 了。
在 Fragment 种使用 MVVM
其实到目前为止,进展都还比较顺利,直至我开始在 Fragment 里面用…… 为了做示范,老夫写一个 APP 的欢迎页面。如果没有登录则提示登录,如果登录了则显示用户名,相当简单把?吧?
现在 APP 都开始用底栏了,就连 Google 自己都开始用了(我个人非常不喜欢),那么没办法,老夫也只能用了。所以我们首页的 Activity,基本上就是一个标题栏、一个底栏,再加上中间的一个 placeholder。

对于这个底栏,在 com.google.android.material 这个库里面提供了 BottomNavigation 可以直接拿来用(说好的 androidx 的包呢?),老夫也不需要把原来自己实现的 View 拿过来啦!
其实重点是放在里面的 Fragment,我们搞一个很简单的 Fragment,用来显示用户名,就完事了:

看起来很简单嘛,按照 LoginActivity 的“开发经验“,这个 loginUser 的 BindingAdapter 写起来很简单:
    @BindingAdapter("loginUser")
    public static void setGreetingsBinding(TextView view, User loginUser) {
        Context context = view.getContext();

        String greeting = getCurrentTimeGreeting(context)
                + (loginUser == null ? context.getString(R.string.login_activity_title) : loginUser.name)
                + context.getString(R.string.exclamatory);

        view.setText(greeting);
    }

    private static String getCurrentTimeGreeting(Context context) {
        Date now = new Date();

        Calendar calendar = Calendar.getInstance();
        calendar.setTime(now);
        int hour = calendar.get(Calendar.HOUR_OF_DAY);

        String greeting = context.getString(R.string.greeting_morning);

        if (hour >= 12 && hour < 19) greeting = context.getString(R.string.greeting_afternoon);
        if (hour >= 19 || hour < 5) greeting = context.getString(R.string.greeting_night);

        return greeting + context.getString(R.string.comma);

    }
这个快就写好了,而且还根据时间来显示“早上好”、“下午好”和“晚上好”,我实在是太厉害了。接着在 Fragment 里完成对应的数据绑定就搞定了:
    @Nullable
    @Override
    public View onCreateView(@NonNull LayoutInflater inflater, @Nullable ViewGroup container, @Nullable Bundle savedInstanceState) {
        binding = DataBindingUtil.inflate(inflater, R.layout.fragment_dashboard, container, false);

        mainActivityCallback = (MainActivityCallback) getActivity();

        View root = binding.getRoot();
        root.findViewById(R.id.fragment_dashboard_welcome_card).setOnClickListener(v -> {
            if (vm.getLoginUser().getValue() == null || vm.getLoginUser().getValue().userId <= 0) {
                mainActivityCallback.launchLoginActivity();
            }
        });

        return root;
    }

    @Override
    public void onActivityCreated(@Nullable Bundle savedInstanceState) {
        super.onActivityCreated(savedInstanceState);
        vm = ViewModelProviders.of(this).get(DashboardFragmentViewModel.class);
        vm.init();
        binding.setViewmodel(vm);
        subscribeToViewModel();
    }
非常容易,我都佩服我自己了。那么来运行一下?我发现不管我怎么调试,不管数据库里有没有记录,始终显示的是未登录状态。在我们的 BindingAdapter 里收到的参数一直是 null。
下面这个从数据库里读出来的 data 始终在该死的 mPendingData 里:

于是老夫各种找问题,比如换 BindingAdapter,换 LiveData 的类型,找了 N 个范例,折腾了一天,还是不行。最后,我在 ViewDataBinding 这个类里发现了 setLifecycleOwner 这个方法,然而它的注释是:
    /**
     * Sets the {@link LifecycleOwner} that should be used for observing changes of
     * LiveData in this binding. If a {@link LiveData} is in one of the binding expressions
     * and no LifecycleOwner is set, the LiveData will not be observed and updates to it
     * will not be propagated to the UI.
     *
     * @param lifecycleOwner The LifecycleOwner that should be used for observing changes of
     *                       LiveData in this binding.
     */
    @MainThread
    public void setLifecycleOwner(@Nullable LifecycleOwner lifecycleOwner) {
......
}
也就是说,如果我们没有给这个 Binding 设置 LifecycleOwner,那么 LiveData 始终不会更新,值就一直放在 mPendingData 里面…… 老夫的一口老血吐出来,为毛老夫在看文档的时候全程没有提示?而且为啥这个 DataBindingUtil 不在 bind 的时候带上这个参数呢……
找到原因之后,就按预期运行了。不管怎样,老夫一定要记住下面这个方法(划重点):
binding.setLifecycleOwner(this);
ComputableLiveData
在调试的过程中,可以发现这个从数据库返回的 LiveData 的类型是 ComputableLiveData,但是它并不是 LiveData 的子类,而且这个类也不向用户公开。其实它包了一层 LiveData 在里面:
@RestrictTo(RestrictTo.Scope.LIBRARY_GROUP)
public abstract class ComputableLiveData<T> {

    final Executor mExecutor;

    final LiveData<T> mLiveData;

    final AtomicBoolean mInvalid = new AtomicBoolean(true);

    final AtomicBoolean mComputing = new AtomicBoolean(false);

    ......
}
这个玩意要使用一个 executor,主要作用就是在有 observer 的情况下,可以对数值进行刷新。
    @VisibleForTesting
    final Runnable mRefreshRunnable = new Runnable() {
        @WorkerThread
        @Override
        public void run() {
            boolean computed;
            do {
                computed = false;
                // compute can happen only in 1 thread but no reason to lock others.
                if (mComputing.compareAndSet(false, true)) {
                    // as long as it is invalid, keep computing.
                    try {
                        T value = null;
                        while (mInvalid.compareAndSet(true, false)) {
                            computed = true;
                            value = compute();
                        }
                        if (computed) {
                            mLiveData.postValue(value);
                        }
                    } finally {
                        // release compute lock
                        mComputing.set(false);
                    }
                }
                // check invalid after releasing compute lock to avoid the following scenario.
                // Thread A runs compute()
                // Thread A checks invalid, it is false
                // Main thread sets invalid to true
                // Thread B runs, fails to acquire compute lock and skips
                // Thread A releases compute lock
                // We've left invalid in set state. The check below recovers.
            } while (computed && mInvalid.get());
        }
    };

    // invalidation check always happens on the main thread
    @VisibleForTesting
    final Runnable mInvalidationRunnable = new Runnable() {
        @MainThread
        @Override
        public void run() {
            boolean isActive = mLiveData.hasActiveObservers();
            if (mInvalid.compareAndSet(false, true)) {
                if (isActive) {
                    mExecutor.execute(mRefreshRunnable);
                }
            }
        }
    };
在我们的 UserDao 编译时,会自动生成一个对应的实现类 UserDao_Impl,在执行具体 SQL 语句后,就会给出它的实现:
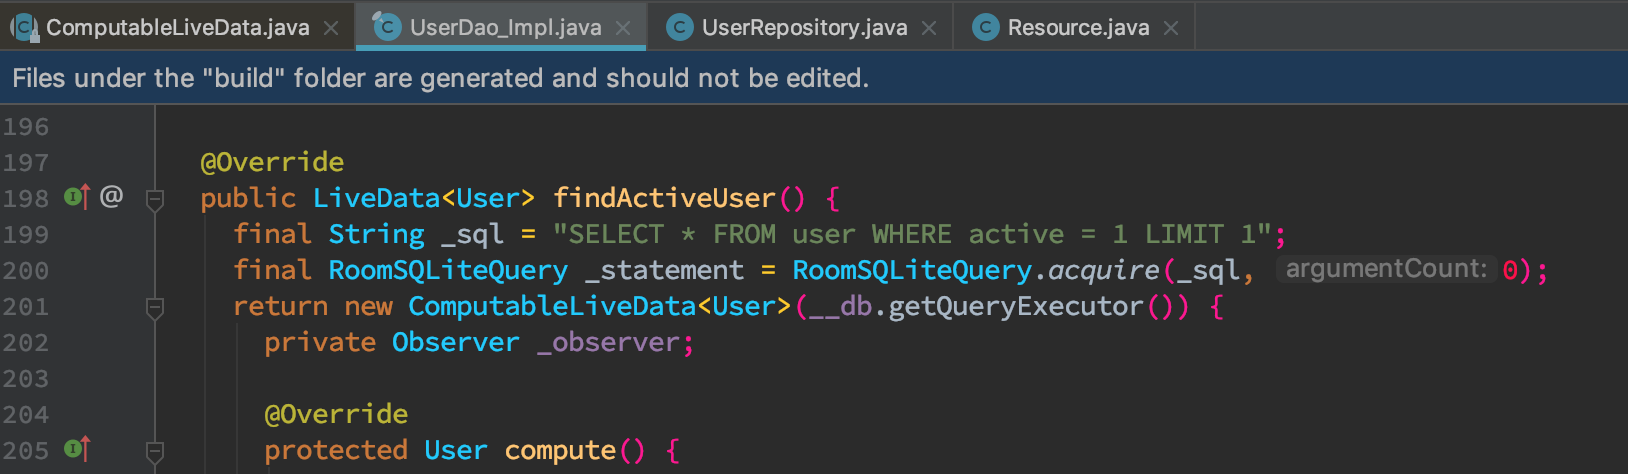
在这里的 compute 方法,实现 ComputableLiveData 里 compute 这个抽象方法,具体就是从数据库里读取数据。UserDao_Impl 最终调用 getLiveData 来获取其中的 LiveData 对象。
总结
至此,老夫总算按照 Google 推荐的模式写了一个 demo 性质的东西。其实还有很多地方都没有实现,比如在 RecyclerView 中实现啦等等,目测还有很多坑。老夫将要继续这个踩坑之旅。